How To Build A DHTML Navigation Portal Step by Step
- Choose a Navigation Portal DHTML Template.
- View it in a full window.
- Look at the DHTML code.
- Study the CSS stylesheet, with size and position data.
- Create your own banner.html, footer.html files.
- Change the size and position of the iframes (banner, nav, etc.) as needed by editing the CSS stylesheet.
- Point the nav, navr, or topnav frames to a skyBuilders navigation panel generator link.
- Change the styles (font, colors, alignments, etc.) of the nav panel.
- Change the menu items in the nav panel and their hyperlinks.
- If you want to use the resulting DHTML page on a web site without skyBuilders timeLines tools, save the page source in your browser. We call this a static "peel" of the dynamic code.
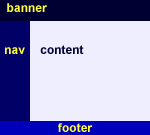
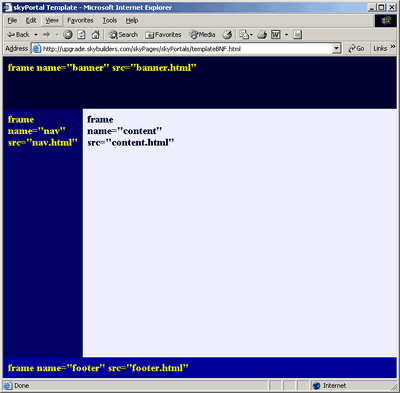
1) Decide on a Navigation Portal design, say one with a banner (usually the home of global site-wide navigation), a navigation bar on the left side (for local navigation in sections of the site), and a footer frame (often home for support links, copyright info, etc.), like this (called template BNF):

View HTML CSS
Note that these frame colors are only suggestions. They reveal the underlying architecture of the page. If you make all the frames have identical colors, the navigation architecture becomes invisible to the user, but it still functions without obtruding on your page aesthetics.
2) Click on View to see the way the portal design will look in the browser:

3) Click on DHTML to see the DHTML iframes code. Copy and paste this DHTML code into skyWriter. This will usually become your index.html file.
<html>
<head>
<title>skyPortal DHTML Template BNF</title>
<link rel="stylesheet" href="BNF.css">
</head>
<body>
<iframe name="banner" id="banner" scrolling="no" frameborder="no" src="banner.html">
<iframe name="nav" id="nav" scrolling="no" frameborder="no" src="nav.html">
<iframe name="content" id="content" scrolling="no" frameborder="no" src="content.html">
<iframe name="footer" id="footer" scrolling="no" frameborder="no" src="footer.html">
</body>
</html>
Click on CSS to see the stylesheet code that controls size and position of each iframe. Change the top, left, width, and height values for each iframe to achieve the desired look.
#banner {
position:absolute;
top:0px;
left:0px;
width:800px;
height:90px;
background-color:#eeeeff;
border-width:0px;
scrollbars:no;
}
#nav {
position:absolute;
top:90px;
left:0px;
width:120px;
height:494px;
background-color:#000066;
border-width:0px;
scrollbars:no;
}
#content {
position:absolute;
top:90px;
left:120px;
width:680px;
height:494px;
background-color:#eeeeff;
border-width:0px;
scrollbars:no;
}
#footer {
position:absolute;
top:564px;
left:0px;
width:800px;
height:36px;
background-color:#eeeeff;
border-width:0px;
scrollbars:no;
}
4) Make your own banner.html and footer.html files.
They may contain any graphics and text you want. You need only make the material fit into the size of the banner and footer frames, or change the iframe sizes appropriately in the next step. It's a good idea to include a logo image in the banner on the left that is a link back to the home page.
You may write your own nav panel code, or use the skyBuilders navigation panel generator (a database-backed Dynamic HTML tool that is browser independent).
When you use the skyBuilders navigation panel generator, you change the src attribute in the nav iframe.
For example, change src="nav.html" to src="/timelines/Nav.html?DoWhat=generate&selectedOptionID=1.
The selectedOptionID (here = 1) should match the number of your nav panel (See Step 6).
5) To change the sizes of the banner, nav, and footer frames (to fit the content you design) you must edit the values for the width and height pixels settings in the CSS stylesheet.
In our examples, the height of the banner iframe is 90 pixels, 36 is the height of the footer iframe, and the height of the content area (the remaining pixels in the middle) is 494 to give a total of 600 pixels. The page width is 800 pixels. In a DHTML page, this size remains fixed as you widen the browser.
6) To use the skyBuilders navigation panel generator, go to Pages/Portals > Manage Nav Panels in timeLines.
Help is available for Manage Nav Panels.
7) To change the styles (font, colors, alignments, etc.) of a nav panel, go to Pages/Portals > Manage Nav Styles in timeLines.
Help is available for Manage Nav Styles.
8) To change the menu items in the nav panel and their hyperlinks, go to Pages/Portals > Manage Nav Panels in timeLines.
9) To use this page without timeLines, while viewing it in a browser do either:
- Save As
-
View Source, Select All, Copy and Paste the source into an HTML file
These capture the "client-side" Javascript code needed to execute a sophisticated skyPortal without timeLines tools present on your server. (We call this a static "peel" or skyLight version of a dynamic server-built page.) Of course you cannot change things as easily (as Steps 6-8) without skyBuilders tools, but you might look into the code and change the HTML directly to alter menu item names and hyperlinks.
Good luck.
skyBuilders.com

